I am learning how to build electronic gadgets using micro controllers with an aim to build a micro controller with various sensors (e.g. temperature, soil moisture, wind speed etc.) and have the data posted to Google sheets or a cloud-based data storage service.
I purchased a Arduino starter kit and a few electronic books and I am slowly learning how to use these devices. I wish to send the data to the cloud through Wi-Fi and I found a board from Robotdyn that had Wi-Fi integrated into it. Following are the lessons I've learned to date that can hopefully help others wishing to use this board. If you are experienced in Arduino then probably this page too basic for you, however I appreciate your wisdom,assistance and feedback. I wish to emphasise I am only a learner and there are probably better ways to achieve the end result. I'm very interested to get your feedback and suggestions.
Advantage of integrated Wi-Fi
The board has integrated Wi-Fi (ESP8266) so there is no need for external connections. A problem with externally attaching the ESP8266 is that you need a 3.3 V 200 mA, power supply, and the Arduino boards 3.3 V output pin only provides about 40 mA. I read you can buy a 5 V to 3.3 V step down module (AMS1117) so you can use the 5 V pinout that is able to supply up to about 400 mA, but that's another thing to purchase and wire up. Out of curiosity I did try to connect an ESP8266 to the 3.3 V pinout, I was able to send AT commands to check the unit but I got an error when trying to connect to Wi-Fi, I assume there was not enough amperage to run the Wi-Fi.Beginning Arduino
To start off I mainly based my knowledge on three books (Electronics for dummies, Beginning Arduino -McRoberts & Beginning C for Arduino - Purdum), Arduino website and lots of tutorials. I bought various boards and firstly got the blink sketched to run and then progressed onto reading sensors.First hurdles - dip switches
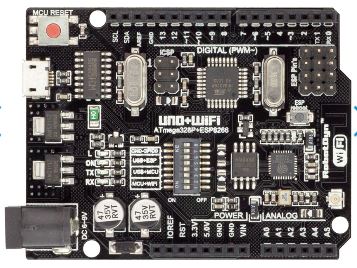
The Robotdyn R3 has three microchip, (1) the CH340 that connects the USB port of your computer to the main chip or the Wi-Fi chip, (2) the main chip (ATmega328) for storing programs and running the Arduino and (3) the chip on the Wi-Fi unit; ESP8266. There are dip switches on the board (outlined on the Robotdyn website) so you can either connect your PC to the ATmega328, or the ESP8266. This is so you can load code onto either chip. If there were no dip switches then when you try to load code it would try to load onto both chips and would not work, so you need to isolate the USB connection to only one chip.Difficulty of ESP8266 connected to the ATmega328
You can set the dip switches so the unit can either act solely as a standard UNO board or a ESP8266 module. However I wanted to read senses on the Arduino ATmega328 chip and then post it to the web through the ESP8266 chip. To enable communication between the ATmega328 and the ESP8266 you need to set the dip switches to connect them together. You can also keep the connection between the USB chip (CH340) or the ATmega328 or the ESP8266 so you can read messages during operation, but only keep the connection between one or the other, not to both.As explained to me from the Robotdyn support team the connection between the ATmega328 and the ESP8266 is a hard wired connection between RX and TX pens of both chips. This is the standard way that a connection is made if you had to use an external ESP8266 connected to an Arduino board. I have not tried it but I was told by support you can keep the dip switches turned off to isolate the two chips and connect the RX and TX pins of either boards by wires to get a similar result, but why bother if there is a ready and hard connection for you.
I was able to load sketches onto the ESP8266 to connect to the Wi-Fi and send data to Google sheets and to a cloud data service called "Favoriot". I was also able to load sketches onto the ATmega328 and read various temperature, humidity and wind sensors and output their readings to the serial monitor. I came across a major hurdle in trying to send the data from the ATmega328 to the ESP8266 so then the ESP8266 could post the data to the web. I found a very informative post on the Arduino forum that provided some code that did the job (see the post). I then modify this code to write a sketch that sends data back and forth from the ATmega328 to the ESP8266. I can then view the Serial.println messages from either Chip on the serial monitor to check that it's actually working.
The code that is on the ESP8266 listens for any serial.print sent by the ATmega328, then adds some extra data to it and sends it back to the ATmega328 so I know that it's done the loop. I send the data back and forth as JSON. As I am a beginner I expect this code is crude by experienced standards, but it worked and helped me to learn how to use the unit. An interesting observation was that any serial.print message made by the ESP was received by the ATmega328, but the ESP8266 only received data that wsa sent by "printTo(Serial)" and did not receive Serial.println messages. The end result was I had to comment out "//" all Serial.println messages on the ESP8266 or it would overload the ATmega328 with data. I also had to separate the data sending by at least 10 seconds or so I started getting errors. Following is the code I used to test the unit to send messages back and forth.
I was unable to send AT commands from the ATmega328 to the ESP8266. I have read that the ESP8266 has a sketch on it to read AT commands and if you load a sketch onto the ESP8266 it deletes this sketch and you are no longer able to communicate to the ESP8266 by AT commands. However out of curiosity I did connect an external ESP8288 module to the board via wires and the RX/TX pins and I was able to make some basic communication via AT commands. I currently have a query lodged with Robotdyn support to provide information on how to enable the ESP8266 to accept AT commands. I have a few Robotdyn boards that I have not loaded a sketch onto the ESP8266 and did try to send AT commands to these boards but it did not work. I noticed that the LED on the ESP8266 on the Robotdyn was blinking by default and I suspect it has a sketch that enables the LED to blink rather than to accept AT commands. I did read that I may have to reflash the firmware on the ESP8266 to re-enable it to accept AT commands, but I first wish to get guidance from Robotdyn. You might be wondering why do I want to send AT commands if I have already worked out a way to communicate with the ESP8266; I think that sending AT commands is easier and possibly more reliable than the current method I'm using to communicate to the ESP8266 and I wish to learn and try it.
In my next post I'll provide the code that I use to communicate to Google sheets and the favoriot cloud data server.
If anybody has any comments, assistance or suggestions, please provide them.
Loaded onto the ESP8266
// Simple sketch on the ESP8266 to read data sent from ATmega328
//Dip switch 1,2 are set "On" to connect the ATmega and ESP serial TX/RX
// If you want to read the ESP in the serial monitor whilst ATmega and ESP connected then set dip switch 1,2,5,6 to "On"; at this setting any Serial.println will be sent back to the Atmega and confuse the JSON parsing so comment them all out that you do not want sent
// ArduinoJson must be version 5
// Every Serial.println message from ESP gets sent back to the Arduino, this is why all println are commented out soonly data is sent
#include <ArduinoJson.h>
void setup() {
//Serial.begin(115200); // got errors at this rate
Serial.begin(57600);
//Serial.begin(9600);
}
void loop()
{
bool StringReady;
String json;
//ACCEPT DATA FROM THE ARDUINO
while (Serial.available()){ // listen for serial data from the Arduino Atmega328
json=Serial.readString();
StringReady = true;
}
if (StringReady){
StaticJsonBuffer<200> jsonBuffer; // preallocated memory to store the JsonObject max 200 bytes
JsonObject& root = jsonBuffer.parseObject(json); // turning the string into JSON data
if(!root.success()) {
//Serial.println("parseObject() failed");
return ;
}
String rawTemp = root["temp"]; //
String temperatureMessage = rawTemp + "oC : temperature recieved from Arduino at ESP"; //
//Serial.println();
//Serial.println(temperatureMessage);
// Serial.println();
root.remove("temp");// remove the temp field from the JSON root object so I can reuse the root object to send back data
// if the serial console is open it will print: 22:40:32.989 -> 21oC : temperature recieved from Arduino at ESP
// SEND DATA BACK TO THE ARDUINO
//delay (5000); // delay the send back by 5 seconds
String tempMessageSendToArduino = rawTemp + "oC OK";
DynamicJsonBuffer jbuffer;
// JsonObject& root = jbuffer.createObject(); // no need as the root object is alreadly made, if I wanted a new one I would put it here
//Serial.println("Data sent back to Arduino in next line");
root["retMsg"] = tempMessageSendToArduino; // I am reusing the root object, I could make a new one
root.printTo(Serial);
Serial.println();
}
}
Loaded onto the ATmega328
// Simple sketch on Arduino ATmega328 to send preset data in a "temp" JSON field to the ESP8266
// Upload to ATmega328 with dip switch 3,4 set ON
// To read the serial monitor for messages sent and returning message set dip switch 1,2,3,4 ON
// ArduinoJson must be version 5 https://arduinojson.org/v5/doc/ , in the future need to change code in this sketch for Ver 6
#include <ArduinoJson.h>
void setup() {
//Serial.begin(115200);
Serial.begin(57600); // more reliable results at this baud rate than at 115200
//Serial.begin(9600);
}
void loop() {
//SEND DATA TO THE ESP8266
delay(10000); // wait 10 sec between each send to the ESP - when changed to 5 seconds did not work properly
DynamicJsonBuffer jbuffer;
JsonObject& root = jbuffer.createObject();
root["temp"] = "21"; // setting up the variable temp to hold 21 in the JSON object root]
root.printTo(Serial); // sending the numeral 21 to the ESP
root.remove("temp");// remove the temp field from the JSON root object so I can reuse the root object to read data from ESP
// if the serial console is open it will print: 22:31:03.228 -> {"temp":"21"}
Serial.println();
// RECEIVE DATA FROM THE ESP
bool StringReady;
String jsonString ="";
StringReady = false;
if (!Serial.available())
return ; // if there is no serial data detected ten it bypasses all code folloing this point
while (Serial.available()){ //listening for any data returned from the ESP
jsonString =Serial.readString(); // putting all of the data into a string
//if (jsonString.charAt(0) == '{') Serial.println("JSON } in data detected."); // checks if the data starts with a { and therefor is a JSON data https://www.arduino.cc/en/Tutorial/StringCharacters
//Serial.println("JSON data detected at Arduino.");
//Serial.println(jsonString);
//Serial.println();
StringReady = true;
}
if (StringReady){ // checking if the string has data
Serial.print(jsonString); // printing out the returning raw string data to the serial console
StaticJsonBuffer<200> jsonBuffer; // preallocated memory to store the JsonObject max 200 bytes
JsonObject& root = jsonBuffer.parseObject(jsonString); // turning the string into JSON data
if (!root.success()) {
Serial.println("Failed to parse config file");
return ;
}
//read the JSON data and put it ito a variable, this should read data back from the ESP 5 seconds after the data is sent
String acceptedTempMessage = root["retMsg"]; //putting the temperature data returned from the ESP into a varialbe
Serial.print(acceptedTempMessage); //prinitng the temperature data returned from the ESP to the serial console
Serial.println(" - successful return");
root.remove("retMsg");// remove the retMsg field from the JSON rtn object
Serial.println();
}
}
Hello, could you please provide information of how did you manage to print the data on google sheets? :)
ReplyDeleteBest Regards
Very helpful. Thanks. Spent hours on it and using your instructions got this working. I am not sure where to go now. I am still not connected to the homes Wifi, nor do I know how to end strings to it if I did. Will keep plodding on. I believe you have got me over the first few hurdles.
ReplyDeleteThanks very much. I finally got the MCU and ESP talking with eachother.
ReplyDeleteI also updated the code example so it uses version 6 of the Arduino JSON.
And I put in a few millisecond delays, so it works more stable, also with shorter amounts of delay between polls of the MCU.
And I discovered that the Serial Monitor should have the same baudrate as the code :)
The code is below, I hope it helps somebody.
/////////////////
ReplyDelete// MCU Code
///////////////
#include
void setup() {
//Serial.begin(115200);//dit is te snel, dan komen de berichten niet goed aan.
Serial.begin(57600); // more reliable results at this baud rate than at 115200
}
void loop() {
//SEND DATA TO THE ESP8266
StaticJsonDocument<256> root;
root["temp"] = "21"; // setting up the variable temp to hold 21 in the JSON object root]
serializeJson(root, Serial);//send naar Serial, wat dus naar de ESP moet gaan.
root.remove("temp");// remove the temp field from the JSON root object so I can reuse the root object to read data from ESP
// if the serial console is open it will print: 22:31:03.228 -> {"temp":"21"}
Serial.println();
// RECEIVE DATA FROM THE ESP
bool StringReady;
String jsonString ="";
StringReady = false;
if (!Serial.available()){
delay(5000); // wait 10 sec between each send to the ESP - when changed to 5 seconds did not work properly
return ; // if there is no serial data detected ten it bypasses all code folloing this point
}
while (Serial.available()){ //listening for any data returned from the ESP
jsonString =Serial.readString(); // putting all of the data into a string
//if (jsonString.charAt(0) == '{') Serial.println("JSON } in data detected."); // checks if the data starts with a { and therefor is a JSON data https://www.arduino.cc/en/Tutorial/StringCharacters
//Serial.println("JSON data detected at Arduino.");
//Serial.println(jsonString);
//Serial.println();
StringReady = true;
}
if (StringReady){ // checking if the string has data
//Serial.print(jsonString); // printing out the returning raw string data to the serial console
auto error = deserializeJson(root, jsonString);
if (error) {
Serial.print(F("deserializeJson() failed with code "));
Serial.println(error.c_str());
delay(5000); // wait 10 sec between each send to the ESP - when changed to 5 seconds did not work properly
return;
}
//read the JSON data and put it ito a variable, this should read data back from the ESP 5 seconds after the data is sent
String acceptedTempMessage = root["retMsg"]; //putting the temperature data returned from the ESP into a varialbe
//Serial.print(acceptedTempMessage); //prinitng the temperature data returned from the ESP to the serial console
//Serial.println(" - successful return");
root.remove("retMsg");// remove the retMsg field from the JSON rtn object
//Serial.println();
}
delay(5000); // wait 10 sec between each send to the ESP - when changed to 5 seconds did not work properly
}
///////////////////////////////////////
ReplyDelete//CODE FOR ESP
/////////////////////
#include
void setup() {
//Serial.begin(115200); // got errors at this rate
Serial.begin(57600);
}
void loop()
{
bool StringReady;
String json;
//ACCEPT DATA FROM THE ARDUINO
while (Serial.available()){ // listen for serial data from the Arduino Atmega328
json=Serial.readString();
StringReady = true;
}
if (StringReady){
delay(1);
// Serial.println("ESP STRING");
// Serial.println(json);
StaticJsonDocument<256> root;
auto error = deserializeJson(root, json);
if (error) {
//Serial.print(F("deserializeJson() failed with code "));
//Serial.println(error.c_str());
return;
}
String rawTemp = root["temp"]; //
String temperatureMessage = rawTemp + "oC : temperature recieved from Arduino at ESP"; //
//Serial.println();
//Serial.println(temperatureMessage);
// Serial.println();
root.remove("temp");// remove the temp field from the JSON root object so I can reuse the root object to send back data
// if the serial console is open it will print: 22:40:32.989 -> 21oC : temperature recieved from Arduino at ESP
// SEND DATA BACK TO THE ARDUINO
//delay (5000); // delay the send back by 5 seconds
String tempMessageSendToArduino = rawTemp + "oC OK";
//DynamicJsonBuffer jbuffer;
// JsonObject& root = jbuffer.createObject(); // no need as the root object is alreadly made, if I wanted a new one I would put it here
//Serial.println("Data sent back to Arduino in next line");
root["retMsg"] = tempMessageSendToArduino; // I am reusing the root object, I could make a new one
delay(1);
serializeJson(root, Serial);
Serial.println();
}
}
Hello Johan, do you use version 6 of the Arduino JSON ?
DeleteThanks in advance for your answer.
Thanks for the write up.
ReplyDelete